
A simple sealer may not be enough when oil regularly reaches your garage floor. A garage floor coating for oil stains, such as an epoxy or polyaspartic system, creates a protective surface that helps limit oil penetration. Spills still need prompt cleanup, and the right option depends on the concrete and how you use the space. In a Chicago garage, consider whether vehicles, tools, or stored equipment expose the floor to fluids regularly.
An old stain doesn’t automatically rule out a coating, but the concrete must be prepared so the system can bond. The stain’s appearance alone may not show whether residue remains or what preparation is needed. Understanding that difference helps you plan before choosing a finish.
This guide compares epoxy and polyaspartic options, explains surface cleaning and preparation, and outlines when a thinner sealer may suit your needs. You’ll learn how to assess stained areas and what to consider before choosing a garage coating. The goal is a practical decision based on your floor’s condition, expected use, and preferred finish.
Key Takeaways
- Choose a coating system based on how often oil and other fluids reach the floor, plus the concrete’s condition and exposure.
- Compare epoxy and polyaspartic finishes by their oil resistance and the way each system suits your garage’s needs.
- Prepare stained concrete carefully: washing and mechanical surface preparation help create a sound base for coating.
- Use a sealer when a thinner protective treatment fits your needs, and understand how it differs from a multi-layer coating.
- Check whether oil has penetrated the concrete before selecting a finish, since contamination can affect coating adhesion.
What should I use if Oil and Other Fluids Are Likely to Sit on My Garage Floor?
For recurring oil spills, a coating can protect porous concrete more effectively than a thin sealer. Remove oil residue first, then choose a compatible primer and coating system.
Bonding Primers and Set-In Stain Degreasers
A bonding primer designed for oil- or grease-affected concrete may support adhesion after cleaning, but it cannot replace contaminant removal. Check that the primer is compatible with both the coating and the concrete’s condition. For set-in spots, apply a concrete degreaser, leave it for the time stated on its label, then scrub. Oil left for months or years can penetrate deeply and be difficult to remove.
Oil Absorption in Porous Concrete
Unfinished concrete has pores that let oil and other fluids move below the surface. A fresh spill can leave a lasting mark if it sits before cleanup. A densifier or sealer can reduce absorption, but it isn’t the same as a multilayer coating. A sealer may keep spilled oil on the surface for cleanup, though fluids can eventually soak through.
Try a simple absorption check: place water drops on different parts of the floor and compare how quickly they disappear. One homeowner reported that water absorbed in a few to several minutes. This observation can help identify areas that behave differently, but it won’t show exactly how far oil has traveled.
Testing Oil Penetration
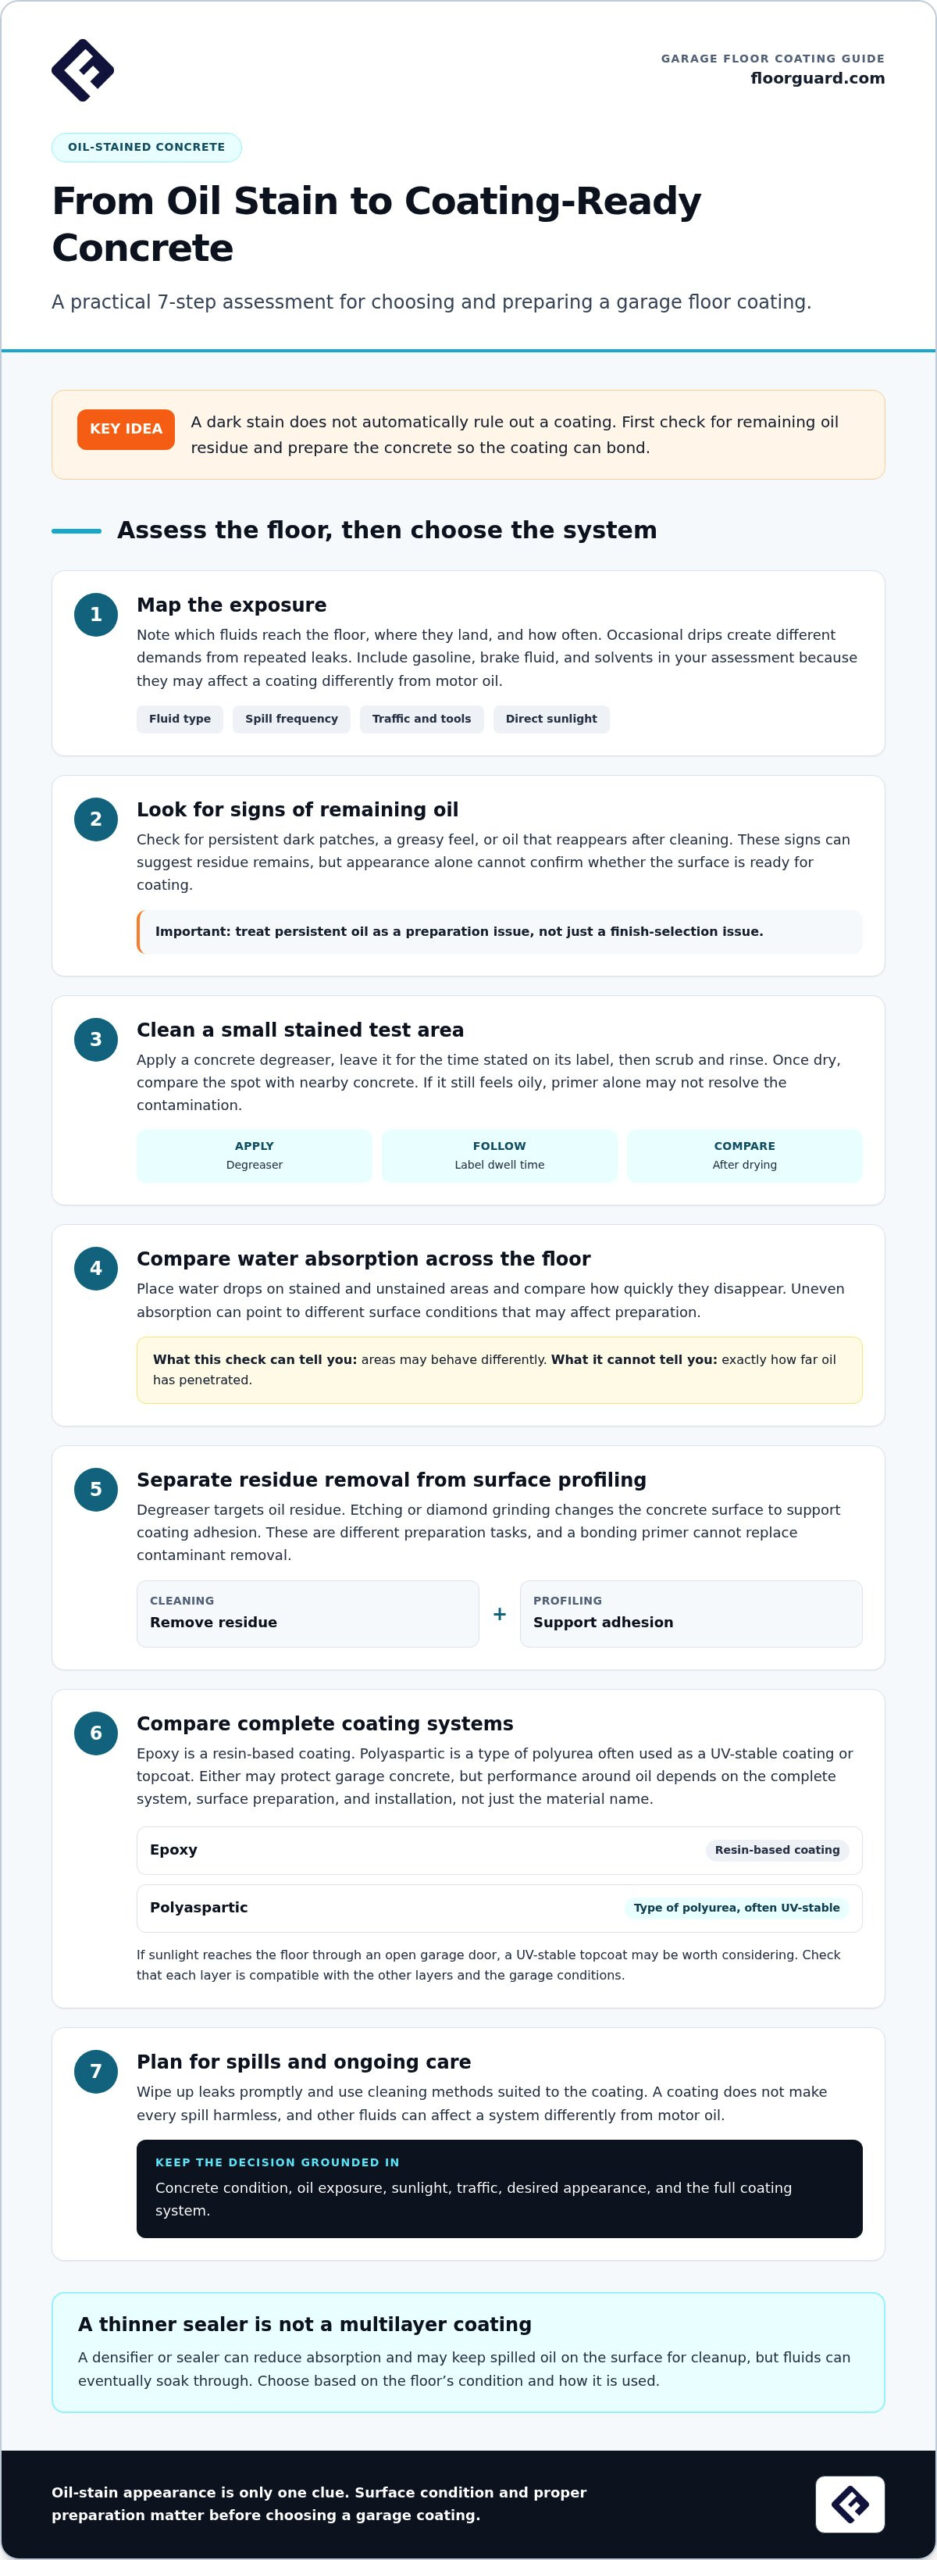
Look for persistent dark patches, a greasy feel, or oil that reappears after cleaning. These signs suggest residue may remain, though appearance alone cannot confirm bonding conditions. Clean a small stained area with degreaser, scrub, and rinse, then compare it with nearby concrete once dry. If the spot still feels oily, primer alone may not solve the contamination problem.
Across the garage floor, compare water-drop absorption in stained and unstained areas. Uneven absorption can point to different surface conditions that affect preparation. Since a coating needs a properly prepared surface, treat persistent oil as a preparation issue, not simply a finish-selection issue.
Are there safety or environmental rules for disposing of oil-contaminated cleaning waste? Used oil containing 1,000 ppm or more of total halogens is presumed to be hazardous waste, according to the National Archives and Records Administration. Rookery Bay National Estuarine Research Reserve advises taking used oil in a labeled container to a hazardous waste collection center, county recycling station, or local service station that recycles oil.
What does DIY garage floor coating cost, including degreasers and primers? DIY costs depend on how much degreaser and primer you need, the coating system, and preparation equipment. Allow for extra materials in heavily stained areas and consider the floor’s condition, since persistent contamination may need more cleaning and preparation.
If you use an oil-dissolving solvent, provide good ventilation and wear protective equipment. Keep it away from open flames, pilot lights, and heating equipment. Some solvent treatments require covering the stain with plastic for several days to a week, so follow the product directions and handle waste responsibly.
Oil resistance of epoxy and polyaspartic coatings
Epoxy and polyaspartic systems can both protect garage concrete, but their performance around oil depends on the complete coating system, not just the material name. Epoxy is a resin-based coating. Polyaspartic is a type of polyurea often used as a UV-stable coating or topcoat. The layers, concrete preparation, and installation all affect how the finished floor handles spills.
Start by considering the exposure your garage sees. Occasional drips beneath a parked car create different demands from repeated oil leaks around a workbench. Consider other fluids, too. Gasoline, brake fluid, and solvents can affect a coating differently from motor oil, so clean spills promptly rather than assuming the floor resists every chemical equally.
Sun exposure can help guide your choice. A garage where sunlight reaches the floor through an open door may benefit from a UV-stable topcoat, a role often filled by polyaspartic. In a shaded garage, other factors may matter more, including the slab’s condition, the look you want, and how you’ll use the floor.
Compare the complete system before choosing. A decorative flake finish, for example, has a base layer and a protective topcoat, each with a different purpose. The topcoat is the exposed surface, so its compatibility with the underlying layers and garage conditions matters. A coating label alone doesn’t explain how the assembled system will perform.
Maintenance also affects real-world oil resistance. Wipe up leaks instead of leaving them beneath a vehicle, and use cleaning methods suited to the coating. Occasional drips followed by regular cleanup are different from fluids left pooled on the floor. Choose a system for your habits, rather than assuming any coating makes spills harmless.
For a practical comparison, list the fluids that reach the slab, where they land, and how often they occur. Note whether the floor gets direct sunlight and whether vehicles or tools create frequent traffic. These details help you weigh chemical exposure, UV stability, appearance, and everyday use. Epoxy and polyaspartic can each suit a garage, but choose by considering the complete system and conditions together.
Surface washing and etching
Oil removal and concrete profiling are separate preparation tasks. A degreaser targets residue, while etching or diamond grinding changes the surface to support coating adhesion. Keep the steps distinct: an etched floor can still contain oil, and washing alone may not create the profile the coating system needs.
For a fresh spill, cover the oil with absorbent material and leave it for several hours or overnight. Remove the material before applying a concrete degreaser. On a set-in spot, let the degreaser dwell for several minutes, then scrub and rinse. A baking soda paste is another spot treatment; leave it for 10-15 minutes before rinsing. Follow the cleaner’s directions, especially for dilution and rinsing, because cleaner residue can interfere with a coating bond.
Work in manageable sections, including the edges of visible stains. Use separate cleaning tools for oily areas and cleaner concrete to avoid spreading residue across the slab. Rinse away the cleaner and loosened grime, then inspect the floor as it dries. One homeowner reported washing a stained floor with TSP before asking about coating it. This illustrates why a cleaner’s name alone doesn’t establish that concrete is ready for coating.
Etching creates a surface profile; it doesn’t dissolve oil trapped in pores. Acid washing and pressure washing have both featured in garage-preparation accounts, but repeated washing doesn’t prove deep contamination is gone. One Garage Journal member reported pressure washing a badly stained floor three times before coating, then acid washing twice and pressure washing after each wash. Those reports describe one floor, not a standard preparation schedule.
Use this sequence to keep cleaning and coating preparation separate:
- Lift fresh oil with absorbent material before applying cleaner.
- Degrease, scrub, and rinse each stain, avoiding cross-contamination between floor areas.
- Let the slab dry, then inspect for cleaner film, greasy residue, and remaining contamination.
- Use the selected coating system’s preparation method, such as diamond grinding, to create its required profile.
Acid etching shouldn’t replace mechanical preparation when the coating system requires grinding. Grinding prepares the surface mechanically, while washing addresses contaminants. Neither step substitutes for the other. A floor may look clean after rinsing but still need grinding before coating. The appropriate method depends on the coating requirements and concrete condition.
Keep oily debris and rinse water from spreading to clean parts of the garage. Collect used absorbent material and follow the cleaner label for handling and disposal. Before coating, confirm the slab is dry and free of visible residue. A final inspection helps catch missed edges or cleaner film before they become part of the finished floor.
Coatings versus sealers
A garage floor sealer and a multilayer coating protect concrete in different ways. A sealer is generally thinner and doesn’t add gloss or a distinct surface layer. It can help keep spilled oil on the concrete surface for cleanup, but fluids eventually soak through. A coating creates a more substantial barrier that can delay oil penetration longer.
Choose a sealer if you want a relatively simple treatment and can clean spills promptly. Because it doesn’t form a distinct surface layer, it doesn’t scratch like a coating surface. That doesn’t make it permanent protection from oil. A small drip wiped up quickly, for example, presents a different challenge from repeated leaks left on the floor.
A coating may suit a garage with frequent oil exposure or where you want a more finished appearance. Coatings generally offer longer resistance to oil penetration than sealers, and some can prevent staining indefinitely, depending on the fluid. That doesn’t mean spills can be left untreated. Clean gasoline, brake fluid, and solvents from coated concrete as soon as possible.
There are tradeoffs. Coatings require considerably more surface preparation than sealers, cost more, and can themselves scratch or stain. They are generally more permanent and attractive, but they aren’t right for every slab. Consider the floor’s condition, expected spills, desired appearance, and whether you can clean fluids promptly.
For new concrete, a garage floor mat over a sealer can help keep oil and other fluids from sitting on the floor. Consider this for a defined parking area that needs extra spill protection without coating the entire slab. A mat catches drips, but it doesn’t replace cleanup or change the sealer’s limitations.
Compare the options by how they work in daily use:
- Sealer: A thinner treatment that can make fresh spills easier to clean, but allows fluids to penetrate eventually.
- Coating: A more substantial system that can extend resistance to oil, with greater preparation needs and a surface that can still scratch or stain.
- Sealer and mat: A useful combination over new concrete when fluids tend to drip in one parking spot.
In short, choose a sealer for simpler protection and prompt spill cleanup. Consider a coating when you want a more finished surface and longer resistance to oil penetration. Either way, match the protection to the fluids in your garage and clean spills promptly.
How can you test whether oil has penetrated too deeply for a coating to bond?
No single homeowner test can confirm that oil-contaminated concrete will bond with a coating. Consider several signs together: where the stain is, whether the surface still feels greasy after cleaning, and whether discoloration remains once the floor dries. These observations can identify areas needing closer inspection, but they can’t measure contamination below the visible surface.
Start by mapping the stained areas. Mark each dark patch with removable tape, then compare it with nearby concrete under similar lighting. Note whether the stain has a sharp edge or extends beyond the visible drip. A golf-cart parking spot, for example, may have separate marks from oil or fuel. Record their locations before washing so you can check the same areas afterward.
After cleaning and drying, press a clean white cloth against each marked spot. A greasy transfer suggests surface residue remains. No transfer is useful information, but it doesn’t prove the concrete below is oil-free. Water-drop absorption can also reveal differences between floor areas, as Garage Journal members have suggested. It compares absorption; it isn’t a direct test of oil depth.
Use this practical check sequence:
- Mark visible oil patches and note nearby clean comparison areas.
- Clean the stain using a concrete-safe degreaser and remove the cleaner residue.
- Let the area dry, then check for oily transfer, returning residue, or persistent discoloration.
- Compare water absorption across marked and unstained areas, treating differences as clues rather than proof.
Persistent oily transfer after cleaning is a reason to pause before coating. A dark mark alone is less conclusive because discoloration can remain after surface residue is removed. Coating over active contamination can undermine adhesion, and adding more primer doesn’t replace suitable cleaning and preparation.
For a clearer assessment, a concrete professional can inspect the slab and evaluate it during mechanical preparation. Diamond grinding exposes the surface profile and can reveal contamination or weak concrete in the affected area. The prepared floor must be clean and suitable for the chosen coating system. A small test patch may offer information about one area, but it shouldn’t replace preparing the entire garage.
Share your stain map, cleaning steps, and cloth-test observations during a floor assessment. Those details help explain where oil appeared and how the concrete responded. Request a garage floor coating assessment to discuss the stained areas and preparation options.
Floorguard: Residential Concrete Floor Coating Installation
Floorguard installs residential concrete floor coatings for homeowners considering a finish after cleaning oil stains. Our team can assess the garage floor’s condition, including visible staining and preparation needs, then recommend a coating system suited to the concrete and how you use the space. Proper preparation matters because leftover contamination can interfere with adhesion.
Choose a professional assessment if stains remain after cleaning, absorption varies across the slab, or you’re unsure whether the surface is ready. A coating can help protect concrete and make routine cleanup easier, but performance depends on the surface, system, and installation. Contact Floorguard to discuss your garage floor and coating options.
Plan a Coating That Fits Your Garage
Your next step is to match the floor’s condition and everyday use with a coating plan. A garage floor coating for oil stains must account for more than visible marks: the concrete needs to be ready for bonding, and the finish should suit the fluids and traffic it will face. Bring the stain locations and cleaning history to your assessment so it can focus on areas that need attention.
Floorguard provides residential, commercial, and industrial concrete floor coating installation. For a garage, our team can discuss the slab and recommend a coating approach based on the project’s needs. If you’re ready to plan the work, contact Floorguard about your garage floor. A clear assessment is a practical first step toward a cleaner, more finished space.
Frequently Asked Questions
Can garage floor coatings be applied over old oil stains?
Yes, a floor with old oil discoloration can be coated if active residue is removed and the concrete is suitable for bonding. A dark mark that remains after cleaning doesn’t automatically mean oil is still present at the surface. Compare the cleaned area with adjacent concrete and check for greasy transfer. Persistent residue needs further cleaning or assessment before coating begins.
How do you remove oil stains from a concrete garage floor before coating?
Use absorbent material on a fresh spill, then clean remaining residue with a concrete degreaser. Scrub the stained area and rinse away the oil and cleaner. A baking soda paste is another option for an older spot. Let the floor dry before assessing it. If oil transfers to a clean cloth, clean the area again rather than covering residue with a coating.
Which garage floor coatings work best on oil-stained concrete: epoxy, polyaspartic, or concrete stain?
Epoxy and polyaspartic are coating materials; concrete stain mainly colors concrete and isn’t an equivalent protective coating. Epoxy is a resin-based coating, while polyaspartic is a type of polyurea often used as a UV-stable topcoat. For a garage floor coating for oil stains, choose a complete system based on the prepared slab, expected exposure, and desired appearance, not the material name alone.
How should you etch or grind an oil-stained concrete floor before coating?
Remove oil contamination before creating a coating profile. Degrease and rinse stained areas first, then assess the clean, dry concrete. Diamond grinding mechanically prepares the surface and is commonly used for coating projects. Etching is a different preparation method, not an oil remover. Follow the chosen coating system’s preparation requirements, since an unsuitable profile or remaining residue can compromise adhesion.
What primer or sealer is recommended for concrete contaminated by oil?
No primer or sealer should substitute for oil removal. Clean the affected concrete, then use a primer only if it’s compatible with the chosen coating system and prepared surface. A sealer is generally thinner than a multilayer coating and doesn’t correct contamination beneath the surface. Choose a primer according to the system’s instructions and the slab’s condition.
What happens if you coat over residual oil, and how can coating failure be prevented?
Residual oil can interfere with adhesion and cause coating separation in contaminated areas. Prevent this by removing grease, rinsing away cleaning residue, allowing the concrete to dry, and preparing the surface for the chosen system. Don’t treat a dark stain alone as proof of active oil. Check for greasy transfer and have persistent contamination assessed before coating.


