
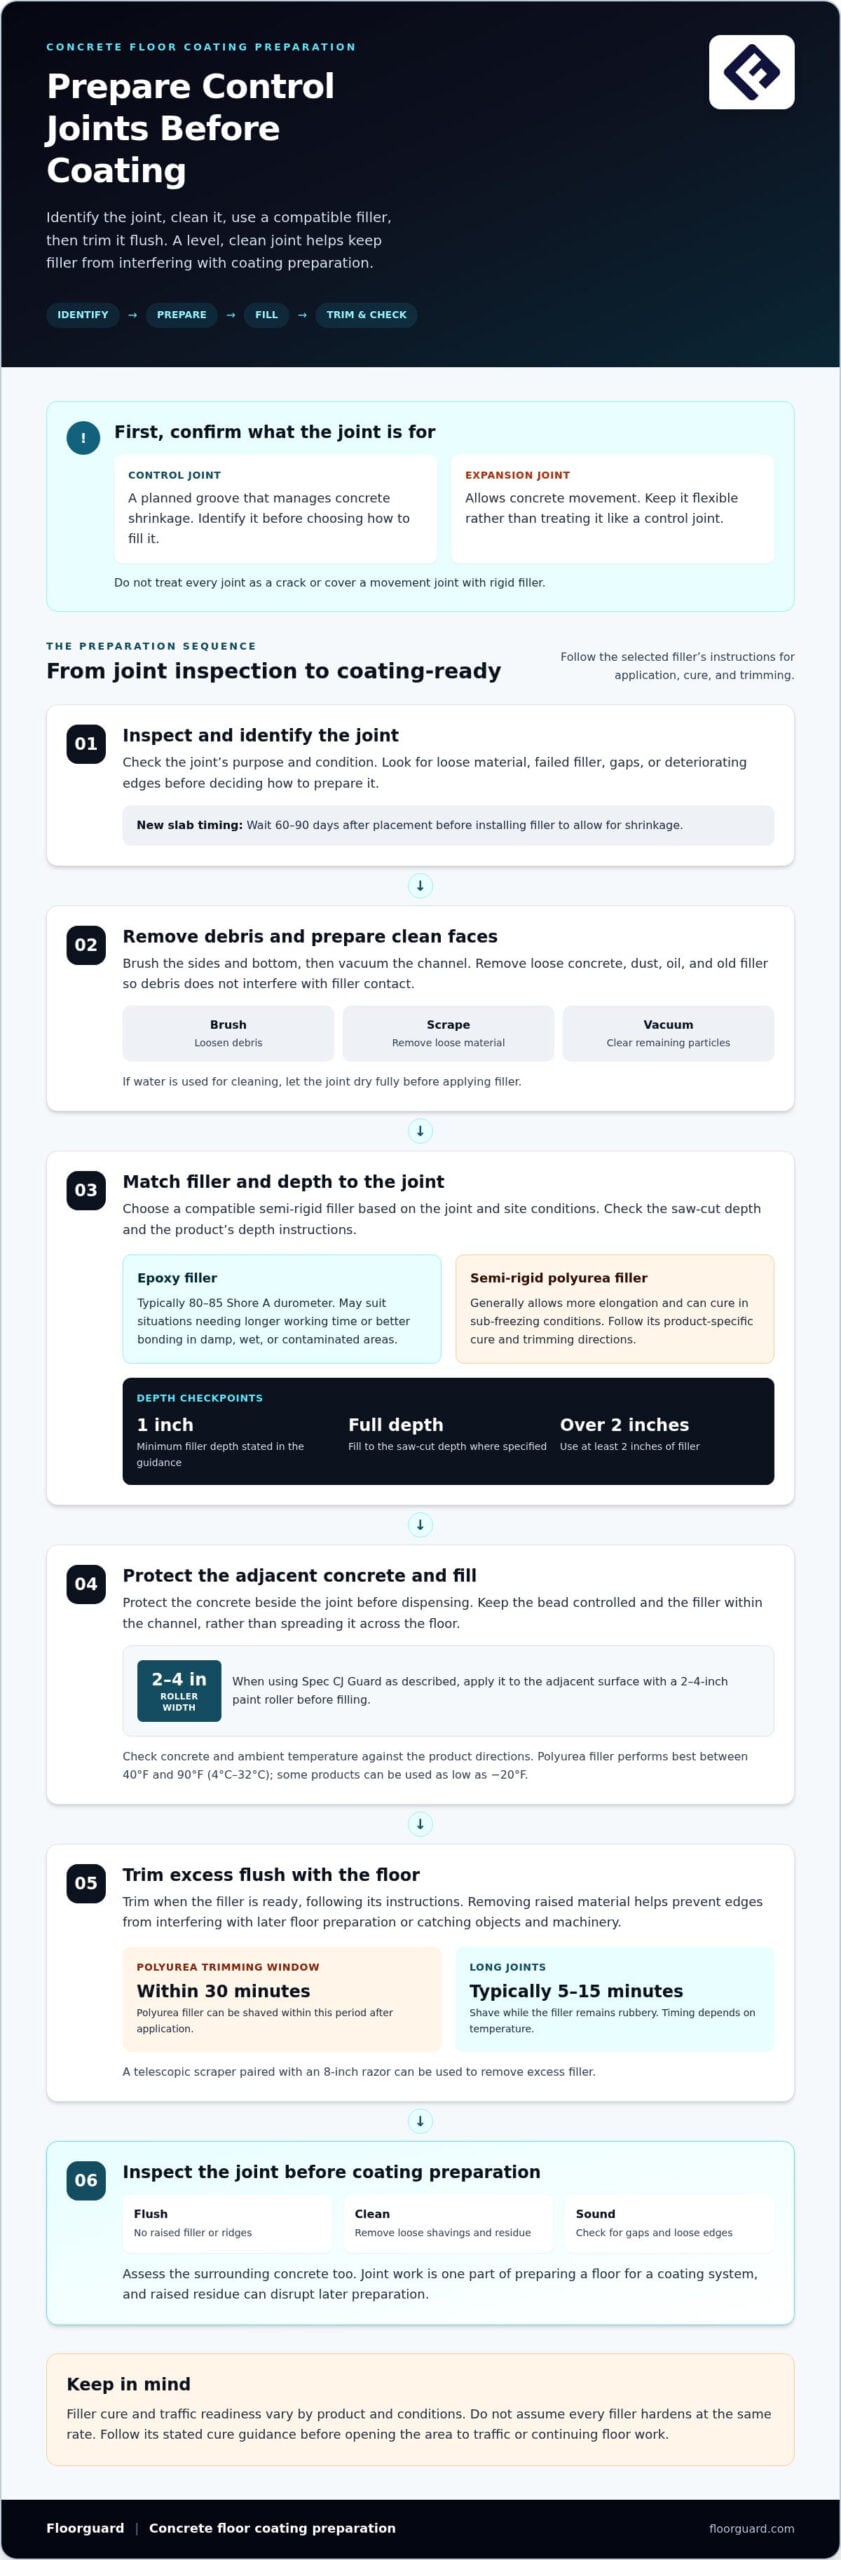
Prepare the joint before the coating, not after it. To learn how to fill control joints in a concrete floor, clean out dust and loose debris, apply a compatible semi-rigid filler, then shave it flush once it has cured enough for trimming. The joint should be ready for the coating system without leaving raised filler that could interfere with surface preparation or the finished floor.
Filling a control joint can support its edges and keep debris out, but the preparation and filler must suit the joint. Control joints manage concrete shrinkage, so don’t treat them as cracks or conceal them with a rigid patch without considering their purpose.
Start by identifying the joint, then clean and prepare it, choose and apply compatible filler, and trim any excess. Joint preparation is only one part of preparing a concrete floor for coating, so assess the surrounding surface as well.
Key Takeaways
- Identify whether a joint is meant to control shrinkage or allow movement before choosing how to treat it.
- Match filler depth and preparation to the joint’s condition so the material can bond and support the edges.
- Protect the surrounding concrete from excess filler, then trim the joint level to avoid disrupting coating preparation.
- Plan joint work as part of the full coating process, including surface checks, mechanical preparation, and curing.
- Choose joint materials and timing based on the slab, site conditions, and the coating system planned for the floor.
Protecting concrete surfaces from filler overfill
Don’t fill a joint before the concrete and joint are ready, use an incompatible filler, or leave material raised above the floor. Keep expansion joints flexible because they accommodate movement, unlike control joints, which manage shrinkage.
-
Set Filler Depth and Installation Timing
Measure each joint and follow its saw-cut depth and filler instructions. Apply filler to a minimum depth of 1 inch. Where full-depth filling is specified, fill to the saw-cut depth; for joints deeper than 2 inches, use at least 2 inches. For a new slab, wait 60-90 days following placement to allow shrinkage before installing filler.
-
Choose an Epoxy or Polyurea Filler
Choose semi-rigid filler based on the joint and job conditions. Epoxy fillers typically have a hardness of 80-85 Shore A durometer. Semi-rigid polyurea fillers generally allow more elongation and can cure in sub-freezing conditions. Epoxy-based fillers may suit situations needing longer working time or better bonding in damp, wet, or contaminated areas. Follow the product’s cure and trimming directions.
- Protect the concrete beside each joint before dispensing filler. Apply Spec CJ Guard with a 2-4-inch paint roller before filling, keeping the protective material on the adjacent surface. Dispense a controlled bead and avoid spreading filler broadly across the floor. Overfilling can cover minor surface imperfections, but excess material should remain limited to the joint area.
-
Trim Excess Filler Flush with the Floor
Trim excess when the filler is ready, following the product’s instructions. Polyurea filler can be shaved within 30 minutes after application. For long joints, shave while the filler remains rubbery, typically within 5-15 minutes depending on temperature. A telescopic scraper paired with an 8-inch razor can remove excess; cut flush to prevent objects or machinery catching on a raised edge.
- Use recognized joint guidance when protecting concrete edges. ACI 302.1R and the Portland Cement Association recognize semi-rigid fillers as an effective method for protecting joint edges, maintaining load transfer, and extending floor service life. Keep the filler confined to the joint, then inspect for ridges before coating preparation. Raised residue can interfere with later floor work.
- Check temperature and traffic instructions before opening the area. Polyurea filler performs best when concrete and ambient temperatures are between 40°F and 90°F (4°C-32°C), although some products can be used as low as -20°F. Traffic readiness depends on the product and conditions, so follow its stated cure guidance rather than assuming all fillers harden alike.
Cleaning and preparing concrete control joints
For filling, clear debris first, prepare clean joint faces, apply the compatible filler, then remove residue before coating work. The cost depends on joint length and depth, access, and filler requirements; it’s determined after a quote request.
Before coating, make sure control joints are free of loose material and failed filler. A careful sequence of inspection, cleaning, and repair helps prepare the joint and surrounding floor.
-
Gather Joint-Filling Tools and Supplies
Gather a stiff brush, vacuum, scraper, compatible joint filler, and the application equipment specified for the product. Keep cleanup materials close so you can remove spills before they harden. Clean narrow joints carefully by hand, and vacuum longer joints in a consistent pass. Avoid tools that leave debris behind.
-
Clean Joints Before Filling
Before filling, remove loose concrete, dust, oil, and old filler. Brush the sides and bottom, then vacuum the channel to remove particles that could interfere with filler contact. A saw may help clean rough or contaminated faces when appropriate for the joint. If you use water to clean, let the joint dry fully before applying filler.
- Follow the same sequence for each control joint: inspect the channel, remove debris, check that the sides are clean, and apply filler according to its product instructions. Keep the bead controlled to limit spills. Choose the filler and application method for the joint and the planned coating.
-
Clean Up and Maintain Joints
After filling, remove loose shavings and debris before coating preparation. Inspect the joint from end to end for gaps, loose edges, and deteriorating sealant. Expansion joints can be cleaned periodically with water from a hose, but let them dry before applying new material. Replace deteriorated sealant rather than covering it with a fresh layer.
- For failed filler, remove loose or detached material, clean the exposed joint, and prepare it for compatible replacement filler. A top layer over residue can leave contamination beneath the repair and weaken the bond. If failure extends along the joint or the edges are breaking down, assess the full channel before filling again. This keeps the repair focused on the joint, not just its visible surface.
- Use the tools in sequence: brush and vacuum to remove debris, a scraper to remove loose material, and the selected equipment to apply filler. Clean the surrounding floor and inspect for residue that could interfere with coating preparation. Keep the joint dry and dust-free before the next step.
Control joints versus expansion joints
Identify each joint before filling it. Control joints manage shrinkage, while expansion joints leave room for concrete movement. Treating them alike can restrict movement or leave the floor poorly prepared for coating.
- Inspect the joint’s purpose before choosing filler. A control joint is typically a saw-cut groove that encourages shrinkage cracks to form along a planned line. A typical cut is made 6 to 18 hours after slab finishing, depending on temperature, humidity, and concrete mix design. A common cut depth is one-quarter of slab thickness.
- Look for a planned groove pattern when identifying control joints. They’re commonly spaced 8-12 feet apart in each direction, with spacing affected by slab thickness, reinforcement, and site conditions. For example, a regular grid of saw cuts across a garage floor may indicate control joints. Their purpose is to guide cracking, not to create a broad movement gap.
- Identify expansion joints by their function and location. They allow concrete to expand and contract and may appear in large slabs or where a slab meets another structure. A joint beside a wall, column, or separate slab may need to remain flexible. Don’t fill it with rigid material intended for a control joint.
- Match the treatment to the joint. Semi-rigid filler can support control-joint edges and help keep debris out. Expansion joints need room to move, so use a flexible detail instead of bridging the gap with a hard patch. If a garage joint contains foam and flexible sealant, preserve that movement function during coating preparation.
- Check expansion-joint materials before preparing the surrounding floor. Foam backer material can support sealant, and sand may fill a void below the foam. Sealant can be applied over expansion-joint foam with a caulk gun. Don’t pack the gap solid with mortar, which can crack as the joint moves.
- Look for cracks that cross the planned joint line or continue into the slab. A saw-cut control joint may not contain every crack, so don’t assume the coating can conceal movement without proper preparation. Water entering a damaged joint can freeze and contribute to further deterioration. Clean the joint, preserve its intended movement, and choose filler for its function.
- Map the garage joints before filling or coating. Mark control joints for suitable semi-rigid treatment and expansion gaps for flexible treatment. Identifying them first helps prevent rigid filler from restricting an expansion joint and prepares control-joint edges for the coating system.
Preparing joints before filling
Prepare each joint so filler has a clean, stable channel and the joint can function as intended. Check its depth, shape, and bottom before choosing backer material or filler.
- Inspect each joint from end to end before filling. Note shallow spots, uneven saw cuts, loose edges, and debris that may affect adhesion. An irregular control joint may need careful mechanical preparation, while an expansion joint needs a flexible detail. Don’t widen a sound joint without a reason.
- Clean rough or shallow areas with a 4″-5″ angle grinder and diamond blade when joint geometry needs correction. Work carefully along the channel, rather than grinding the surrounding slab unnecessarily. A clean, consistent joint gives filler better contact. Remove grinding dust before applying any material, since dust left in the cut can compromise the bond.
- Check the joint depth before selecting a backing material. For joints deeper than about 1 inch, install foam backer rod before filling, following the filler system’s requirements. The rod helps control how much filler enters the channel. Avoid pushing it unevenly, which can leave inconsistent filler depth or expose sections of the joint bottom.
- For a particularly deep joint, sand may reduce the amount of filler needed when appropriate for the joint and product. In an expansion joint with a void at the bottom, sand can fill the void before expansion foam is placed. Position the foam above the sand to create a surface for sealant, without blocking the joint’s movement.
- Check concrete and ambient temperatures before applying flexible sealant. Excessive heat or cold can affect application and material behavior, so follow the product instructions for acceptable conditions and preparation. Apply sealant only to a clean, dry joint; don’t rely on it to cover moisture or contamination.
- Choose the filler arrangement according to the joint’s function. Semi-rigid filler may support a control joint’s edges, while expansion foam and flexible sealant preserve movement. Apply sealant over expansion-joint foam with a caulk gun, keeping the bead controlled. Don’t fill an expansion gap solid with rigid material or mortar.
- Before applying filler, check that backer rod or foam sits evenly, the joint faces are dust-free, and sand or debris won’t block the intended sealant surface. Correct exposed foam or loose particles first. This final inspection helps prevent voids and uneven filler that could complicate coating preparation.
Preparing joints for floor coatings
Plan the joint detail alongside the coating system. Knowing how to fill control joints in a concrete floor is only part of the work; the prepared joint must also suit the finish and the garage’s intended use.
- Inspect the floor under consistent lighting before coating preparation. Mark joints, surface defects, and areas where the concrete changes in appearance or texture. A darker patch beside a joint, for example, may indicate residue that needs attention. Assess joint work separately from other surface concerns rather than assuming one repair method fits every area.
- Decide how the finished joint should look. Some coating projects retain a visible joint line, while others use a detail designed for a more continuous appearance. Don’t assume a coating should bridge every joint. Set the intended finish before preparation so the joint treatment and coating application work together.
- Review the coating system’s instructions for joint compatibility and application sequence. The filler must suit the coating, and its surface should not leave a ridge or low channel. A small sample layout can help you visualize decorative flakes or a solid-color finish near joint lines before coating the entire garage.
- Plan joint preparation separately from general slab preparation. Mark finished or protected joints before mechanical work begins, then remove dust from the floor and joint edges before coating. This helps keep debris out of the basecoat and protects the prepared joint detail during surface preparation.
- Check how the coating will meet doorways, walls, and changes in floor level. A garage coating that ends at a threshold needs a clean termination, while a joint near a wall may require careful hand preparation. Plan these details before coating, not after the main floor area is complete.
- Coordinate decorative materials with the joint layout. Flakes or pigments can make a joint line less prominent, but they don’t change its purpose or movement. Distribute materials evenly near cuts, and keep decorative media out of joints where it could interfere with the intended detail.
- Before coating, inspect the prepared floor as a whole. Look for dust, residue, uneven transitions, and joint details that don’t match the planned finish. Resolve these issues before applying the basecoat. A final review can reveal missed areas while the concrete is still exposed.
Floorguard: Residential Concrete Floor Coating Installation
Floorguard installs residential concrete floor coatings for homeowners preparing a garage. For Chicago homeowners, joint treatment is one part of the project; the concrete condition and coating system also need to be considered together.
Professional installation is a practical choice when joints are uneven, filler has failed, or you’re unsure how to prepare them for coating. Floorguard can discuss the floor’s condition and plan the coating work around its joint details, helping Chicago homeowners move from preparation to a finished garage floor.
Planning a garage coating in Chicago? Contact Floorguard to discuss your floor and coating options.
Plan the coating around the floor
Knowing how to fill control joints in a concrete floor is a useful starting point. Next, plan how the prepared slab will function as a complete coated surface. Joint details, concrete condition, and coating system all matter. Considering them together helps prevent treating a movement joint like a shrinkage joint or overlooking conditions that affect coating preparation.
Floorguard installs residential, commercial, and industrial concrete floor coatings. For a Chicago garage, our team can discuss the floor’s condition and the coating work needed to move forward. For a larger facility, we can focus on the surface and the space’s requirements.
Bring your questions about the joints and coating project to our team. Contact Floorguard about your floor, and take the next step toward a well-prepared coating project.
Frequently Asked Questions
What materials are best for filling control joints in a concrete floor?
Semi-rigid polyurea or epoxy joint filler may suit control joints, depending on site conditions and product compatibility. Polyurea offers faster curing and greater elongation capability, while epoxy-based filler may be useful when longer working time or bonding in damp, wet, or contaminated areas is needed. For a garage that will be coated, make sure the filler suits the coating system and intended traffic.
How do you prepare concrete control joints before filling them?
Remove loose concrete, dust, debris, and old filler, then inspect the joint faces for contamination or damage. A saw may help clean the faces when old material or rough edges remain. Vacuum the channel and let it dry before filling. Avoid using harsh chemicals for cleaning; use only warm water and mild dish soap.
How deep and wide should a concrete floor control joint filler be?
Apply control-joint filler to a minimum depth of 1 inch. Follow the saw-cut depth where the filler system calls for full-depth filling, and use at least 2 inches in joints deeper than 2 inches. There isn’t one universal width for every floor; the joint’s existing cut and the filler manufacturer’s directions guide the fit. Don’t widen a sound joint simply to use more filler.
Should you use flexible sealant or semi-rigid epoxy for concrete control joints?
Use semi-rigid filler for a control joint when the goal is to support its edges, and flexible sealant for joints designed to move, such as expansion joints. Epoxy-based filler may suit conditions that call for longer working time or bonding in damp areas. In a garage, rigid material across an expansion gap can restrict movement, while flexible sealant may not provide the edge support intended for a control joint.
How long should concrete cure before filling control joints?
For a new concrete slab, wait 60-90 days following placement before installing control-joint filler, allowing time for slab shrinkage. The relevant timing starts from slab placement, not from the day a coating project is scheduled. Before filling, confirm the joint is clean and the concrete and ambient conditions suit the filler instructions. Filler cure time is separate from the slab’s waiting period.


