
A DIY epoxy floor can need reapplication within a few years. When preparation or application goes wrong, garage coatings may develop chips, peeling, or cracks within a year. For Chicago homeowners, problems with DIY epoxy floors affect more than appearance: a smooth coating can become slippery when wet, and a floor that looks finished may still need repairs.
It’s reasonable to expect an epoxy coating to protect concrete and make a floor easier to clean. The outcome depends heavily on the concrete’s condition, surface preparation, moisture, mixing, and curing. Here, we explain what affects a DIY floor’s lifespan, why bubbles and peeling happen, what drives repair or replacement costs, and how slip-resistant flakes or additives can improve traction. You’ll also learn when a coating needs more than a small patch and what to weigh before choosing a floor system.
Key Takeaways
- A DIY epoxy floor may need reapplication within a few years, especially when surface preparation or application is poor.
- Bubbles, pinholes, and uneven texture can result from air escaping the concrete or mistakes during mixing and application.
- Peeling often calls for more than a small patch; the coating may need removal, moisture testing, and a complete replacement system.
- Wet epoxy can be slippery, but slip-resistant flakes or anti-slip additives can improve traction.
- Compare repair needs with the floor’s condition, moisture, exposure, and use before deciding whether to patch or replace the coating.
Why is DIY Epoxy concrete coating a bad idea?
DIY epoxy can fail when concrete preparation, moisture control, mixing, or curing goes wrong. Bubbles, cracks, weak adhesion, and surface flaws can leave a garage floor uneven and in need of repair.
Air Bubbles and Pinholes
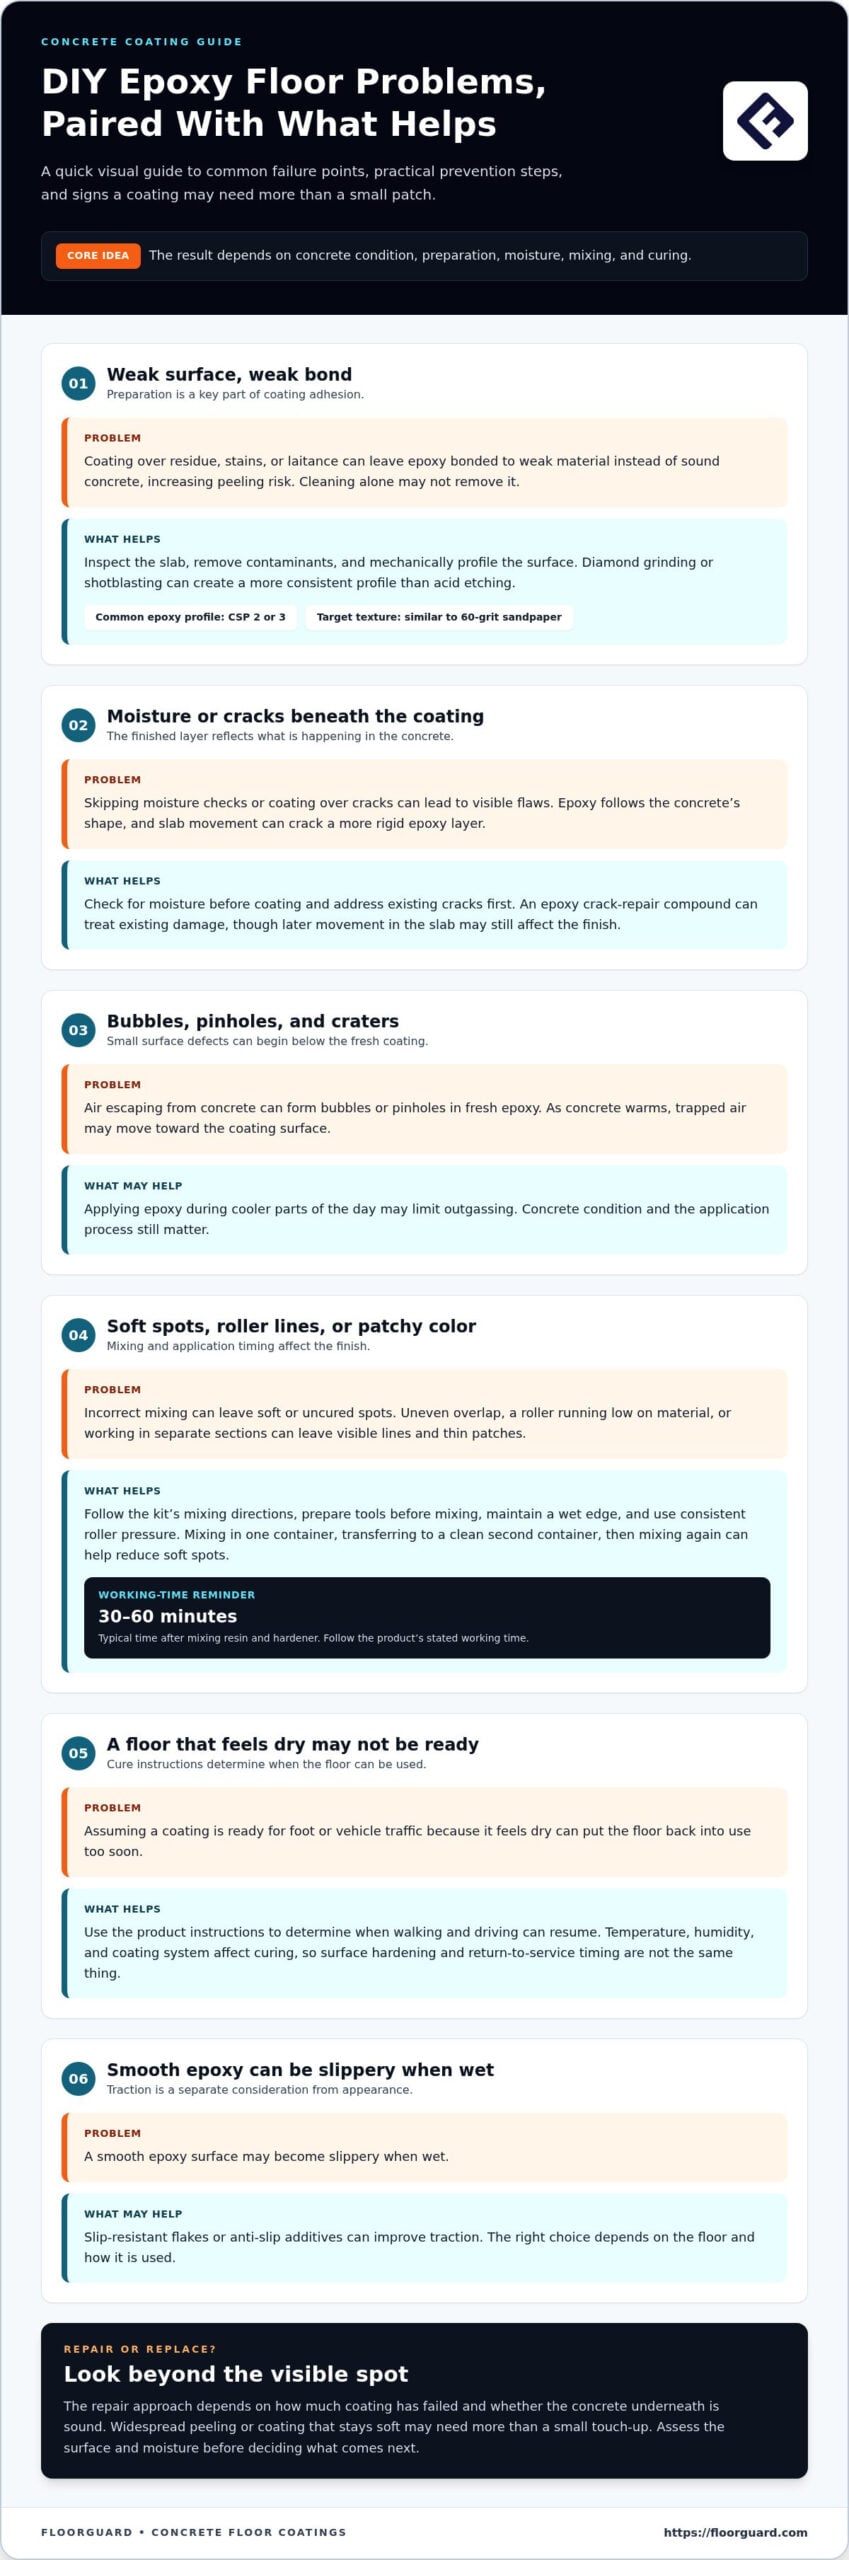
Bubbles and pinholes can form when air escapes from concrete into fresh epoxy. As the concrete warms, trapped air may move toward the coating surface, creating small craters, raised bubbles, or tiny holes that remain visible after curing. Applying epoxy during cooler parts of the day may limit outgassing, though the concrete’s condition and the application process matter too.
Concrete Grinding and Surface Preparation
Concrete grinding removes weak surface material and creates a profile that helps epoxy adhere. Before coating, inspect the slab, check for moisture, remove contaminants, and address cracks or pits. Mechanical preparation, such as diamond grinding or shotblasting, can create a more consistent surface than acid etching. Cleaning alone may leave stains, residue, or weak material behind, preventing a reliable bond.
Cracks Showing Through the Coating
Epoxy follows the shape of the concrete, so existing cracks may remain visible through the finished coating. Temperature and weather changes can also cause the concrete to move, cracking a more rigid epoxy layer. Fill existing concrete cracks with an epoxy crack repair compound before coating. This addresses existing damage, but movement in the slab can still affect the finished surface.
Laitance and Surface Profile
Laitance is a weak, powdery layer of cement and fine particles at the concrete surface. Epoxy applied over laitance may bond to that loose layer instead of sound concrete, increasing peeling risk. Mechanical profiling should expose a firm surface with a texture similar to 60-grit sandpaper. A concrete surface profile of 2 or 3 CSP is commonly specified for epoxy flooring; grinding helps create that profile.
How do epoxy floor kits compare with polyaspartic and other garage floor coatings? Water-based DIY epoxy kits are generally easier to apply than professional-grade epoxy, but may be less durable. Polyaspartic coatings cure quickly and resist sunlight-related discoloration. Regardless of coating type, performance depends on the concrete’s condition and how the floor is used.
Is DIY epoxy flooring safe, and what ventilation and protective equipment are needed? Follow the kit label’s directions for ventilation, protective equipment, mixing, and application. Don’t apply the coating if you can’t meet those requirements in your garage.
What mistakes should you avoid when applying a DIY epoxy floor coating? Don’t skip moisture testing, coat over cracks or residue, or rely on cleaning alone instead of mechanical preparation. Mix resin and hardener as directed. Incorrect mixing can leave soft or uncured spots.
Bubbles, uneven texture, and visible application lines
DIY epoxy can develop bubbles, patchy color, or roller lines when mixing and application are poorly coordinated. In a garage, these flaws can remain visible across the floor after the coating hardens.
Uneven and Patchy Finishes
An uneven finish has visible differences in coating thickness, color, or texture. A roller running low on material can leave thin patches, while inconsistent overlap between wet edges can create lines. Working across the garage in separate sections may also leave noticeable boundaries. Thin areas can wear differently from thicker ones under tires, foot traffic, and routine cleaning.
Working Time and Application Pace
Epoxy’s working time is the period available to spread the mixed material before it thickens. A typical working time after mixing resin and hardener is 30-60 minutes. If one person is still mixing while another finishes a section, the first batch may become harder to spread evenly. A rushed application can leave missed spots; a delayed one can leave ridges where fresh epoxy meets material that has started to set.
Mixing and Application Timing
Mixing and timing matter because epoxy starts curing once its resin and hardener are combined. Follow the mixing directions and apply the batch within its stated working time. Poor mixing can leave pockets of unmixed resin or hardener that cure unevenly, while mixing too vigorously can whip air into the liquid. Mixing in one container, transferring the material to a clean second container, and mixing again can help reduce soft, uncured spots.
Plan the garage application before opening the kit. Clear the floor, prepare your tools, and decide how you’ll cover each section. This leaves more of the stated working time for spreading epoxy instead of finding a roller or moving stored items. Keep a wet edge where sections meet and apply consistent roller pressure to limit lap marks.
How long does DIY epoxy flooring take to cure before walking or driving on it? Follow the product instructions to determine when foot and vehicle traffic can return. Temperature, humidity, and the coating system affect curing, so distinguish between when the surface hardens and when it’s ready for a car.
After application, inspect the floor under consistent lighting. Bubbles, pinholes, roller marks, and color variations may be easier to spot from the garage entrance than directly above the surface. Don’t assume the coating is ready for use just because it feels dry. Follow its cure instructions before walking or driving on it.
Long-term repair and replacement costs
A DIY epoxy floor may need more than a small touch-up if peeling spreads or the coating stays soft. The repair method depends on how much coating has failed and whether the concrete underneath is sound.
Repairing Peeling or Blistering Epoxy
To repair peeling or blistering epoxy, first determine whether the damage is isolated or spreading. A loose edge can mean the coating has lost its bond, while blisters may point to trapped moisture or adhesion problems. Covering the area with fresh epoxy won’t restore the bond underneath. Soft epoxy that hasn’t cured properly needs to be removed and reapplied.
Repairing Peeling Coating
If peeling covers a larger area, grind the failed coating down to bare concrete. Test the slab for moisture before installing a replacement coating system. Partial patches often fail because new material must bond to both exposed concrete and existing coating. If the old layer keeps lifting, it can pull the patch away too, bringing back the same problem.
Long-Term Replacement Costs
Replacement costs reflect the work needed to remove failed material and prepare the floor again. A small, stable defect differs from widespread peeling that requires grinding, moisture testing, crack treatment, and new coating layers. The price depends on the case and is given after a quote request; relevant factors include the damaged area, surface condition, repair needs, coating system, and installation scope.
Compare the full repair cycle, not just the initial DIY kit expense. Epoxy without recommended preparation and protection may fail in 1-3 years, while a properly installed epoxy floor can last 10 to 20 years, depending on use and exposure. Those timeframes show why preparation and service life matter when assessing long-term value.
Hot-tire pickup is one example of how garage use affects repair decisions. Heat from vehicle tires can contribute to coating peel as the tires heat up and cool down. If epoxy has detached along tire paths, assess the surrounding coating as well. Removing and reinstalling the full coating may make more sense than repeatedly patching areas exposed to the same conditions.
Before choosing a repair, note where the epoxy is soft, blistered, or separating, and whether the damage is spreading. A record of the affected areas can help distinguish a localized flaw from broader coating failure. The condition of the concrete, moisture readings, and the amount of coating to remove all shape the replacement work.
Peeling and delamination from poor surface preparation or contamination
Epoxy can delaminate if it bonds to residue or weak concrete instead of a clean, sound surface. The first flakes may appear near an oil spot, polished area, or damp section.
Acid Etching and Mechanical Preparation
Acid etching uses a chemical solution to roughen concrete, while mechanical preparation removes or abrades surface material. Acid washing can produce inconsistent results and may not prepare the slab evenly. Diamond grinding creates a more controlled surface for coating adhesion. A missed strip beside a wall or around a floor drain can become a weak point where peeling starts.
DIY Kit Preparation Limitations
A DIY kit’s cleaning solution may not remove stubborn stains or properly prepare concrete for coating. Motor oil, silicone, and floor polish residue, for example, can interfere with adhesion. A surface that looks clean may still contain contaminants that cause coating defects and undermine durability, even if the epoxy is spread evenly.
Preparation needs to suit the slab, not just follow the kit’s cleaning steps. Before applying epoxy, inspect for old coatings, oil stains, polish, dust, and moisture. A garage floor with an old coating needs a different assessment from bare concrete. Moisture testing matters because uncontrolled moisture can contribute to peeling. Grinding can help remove surface contaminants and uneven material before coating.
Look closely at where separation begins. Peeling over a stained area may point to contamination; lifting across a broad section may indicate poor preparation or moisture concerns. Flaking can expose the concrete, and continued coating failure may damage its surface. Don’t assume new epoxy will bond to loose material just because the exposed area is small.
Acid etching can pose safety risks and produce uneven results. Mechanical preparation, such as diamond grinding or shotblasting, creates a more consistent surface for bonding. The right method depends on existing coatings, stains, and the slab’s condition. A stubborn stain may need mechanical removal rather than another attempt with a household cleaner.
Before recoating, remove failed epoxy and contaminants, then assess the bare concrete. Check that the surface is sound and dry, and test for moisture. Include coating-related cracks or pits in the preparation plan. Applying a new layer over a peeling edge or oily patch may conceal the weak bond without correcting it. Thorough surface preparation gives a coating a better chance to adhere and perform as intended.
Slip resistance on smooth epoxy floors
A smooth epoxy floor can become slippery when water, snow, or vehicle fluids reach its surface. In a Chicago garage, consider where people walk and which liquids the floor may encounter when choosing traction.
Epoxy creates a continuous surface that’s easy to clean, but a smooth finish provides less texture underfoot. Water tracked in on shoes can reduce traction near an entry, while antifreeze or cleaning solution can create a slick spot. A dry floor may feel secure, but moisture and residue can change the footing.
Slip-resistant flakes or anti-slip additives can improve traction when incorporated into a floor coating. Silica sand is another material used to reduce slipperiness. The placement and amount affect the finished texture. A garage used for walking, parking, and storage may need a different balance from a decorative floor that sees light foot traffic.
Consider how the floor is used before selecting a finish. For example, a household that regularly enters through the garage in wet shoes should prioritize traction along that route. Smooth surfaces may be easier to clean, while added texture can make dirt harder to remove from small grooves. Weigh traction against cleaning needs, appearance, and the liquids likely to reach the concrete.
Keep texture consistent across transitions. If traction additive is concentrated near the garage door but absent beside steps, the footing can change from one area to another. Consider traffic paths, water exposure, and maintenance when choosing a coating system. A decorative flake finish or glossy appearance doesn’t automatically provide sufficient grip.
Do building codes or local regulations restrict DIY epoxy floor installation? Requirements depend on a building’s location and use. A private residential garage and a commercial space may have different considerations, so don’t assume a DIY kit is appropriate for every facility.
Assess traction with wet footwear, tracked-in snow, vehicle fluids, and smooth areas near entrances in mind. Anti-slip additives or flakes can improve grip, but no coating eliminates every slip hazard. Keep the floor clean, address spills promptly, and follow the coating’s maintenance instructions. If you’re planning a garage floor coating, contact our team to discuss traction and finish options for your floor.
Floorguard: Residential Concrete Floor Coating Installation
Floorguard installs residential concrete floor coatings for Chicago homeowners whose DIY coatings peel or bubble, or whose garage floors need more traction. Our team considers concrete condition, moisture, sunlight, traffic, and desired finish when selecting a suitable system. Professional preparation and product selection matter because they affect adhesion, durability, appearance, and traction.
If your existing epoxy is lifting or you’re planning a new garage floor, a professional assessment can clarify whether the coating needs replacement and which system suits the space. Floorguard installs residential concrete coatings based on the floor’s use and finish requirements. Contact Floorguard to discuss your concrete floor.
Choose a coating plan that fits your floor
Start by identifying what the floor needs to handle, not just which finish looks appealing. Note where the coating has failed, how the space is used, and whether sunlight, vehicle traffic, moisture, or spills affect it. These details help frame a practical conversation about the floor’s condition and intended use.
Understanding problems with DIY epoxy floors can help you decide when another home-applied layer won’t address the underlying issue. Floorguard installs residential, commercial, and industrial concrete floor coatings, selecting a system to suit the space and its requirements.
Bring your questions and floor concerns to our team. Contact Floorguard about your floor to discuss a coating project and possible next steps. A well-considered plan can help you move forward with greater confidence and a floor suited to everyday use.
Frequently Asked Questions
How long will a DIY epoxy job last?
A DIY epoxy floor without recommended preparation and protection may fail in 1-3 years. A properly installed epoxy floor can last 10 to 20 years, depending on use and exposure. These different lifespans reflect the whole system, not just the resin: concrete condition, moisture control, application quality, and daily wear all matter. A garage with regular vehicle traffic puts different demands on a floor than a lightly used storage area.
What is included in a DIY epoxy kit?
DIY epoxy kits vary, so read the package contents and instructions before planning the work. A kit may include epoxy components, cleaning solution, and application tools, but those items may not cover every preparation need. Crack repair materials, moisture testing, and mechanical grinding may require separate planning. A cleaning solution may not remove stubborn stains or prepare concrete for a lasting bond.
What are the most common problems with DIY epoxy floors?
Common problems with DIY epoxy floors include peeling, bubbles, pinholes, uneven texture, visible roller lines, and soft or sticky areas. A smooth finish can also become slippery when wet. An oily spot may interfere with adhesion, while incorrectly mixed epoxy can leave an uncured area. Since these signs have different causes, note where they occur and whether they spread before deciding how to address the coating.
Why does DIY epoxy floor coating peel or delaminate?
DIY epoxy peels when it doesn’t bond securely to the concrete or an existing coating. Oil, silicone, polish, dust, weak surface material, and uncontrolled moisture can interfere with adhesion. Peeling near an old stain may point to contamination, while lifting across a broad area may indicate a larger preparation or moisture issue. Applying new material over loose coating won’t restore the bond underneath.
How do moisture and concrete preparation affect epoxy floor adhesion?
Moisture and preparation affect whether epoxy can bond to sound concrete. Moisture moving through a slab can contribute to coating failure, while dust, stains, or a weak surface layer can prevent proper contact. Before coating, inspect the slab, test for moisture, remove contaminants, and mechanically prepare the surface. An oil-stained garage floor, for example, may need more than the cleaning step included in a kit.
How can you prevent bubbles, pinholes, and uneven coverage in an epoxy floor?
Reduce these defects by preparing clean concrete, following the kit’s mixing directions, and applying epoxy within its working time. Air escaping from concrete can cause bubbles or pinholes, while uneven roller pressure can leave patchy coverage. Avoid whipping excess air into the mixture, and plan the application so you can maintain a wet edge. Check the slab and product instructions for conditions that affect outgassing and curing.
What temperature and humidity conditions are required to apply epoxy floor coatings?
Follow the air and concrete temperature and humidity limits in the coating instructions, as requirements vary by product. Temperature and humidity can affect adhesion and curing; applying outside the stated range can result in a longer cure or flawed finish. Check garage conditions before mixing, and don’t assume a comfortable room temperature means the concrete is within range. Don’t apply the coating if the specified conditions aren’t met.
How do you repair peeling, chipped, or scratched DIY epoxy flooring?
For widespread peeling, remove the failed coating down to bare concrete, test the slab for moisture, and prepare it for a complete replacement system. Partial patches often fail when surrounding epoxy is loose or poorly bonded. For a small chip or scratch, first check whether the surrounding coating is firmly attached. Adding material over lifting edges won’t fix the underlying bond. Remove and reapply soft, uncured epoxy as needed.


