
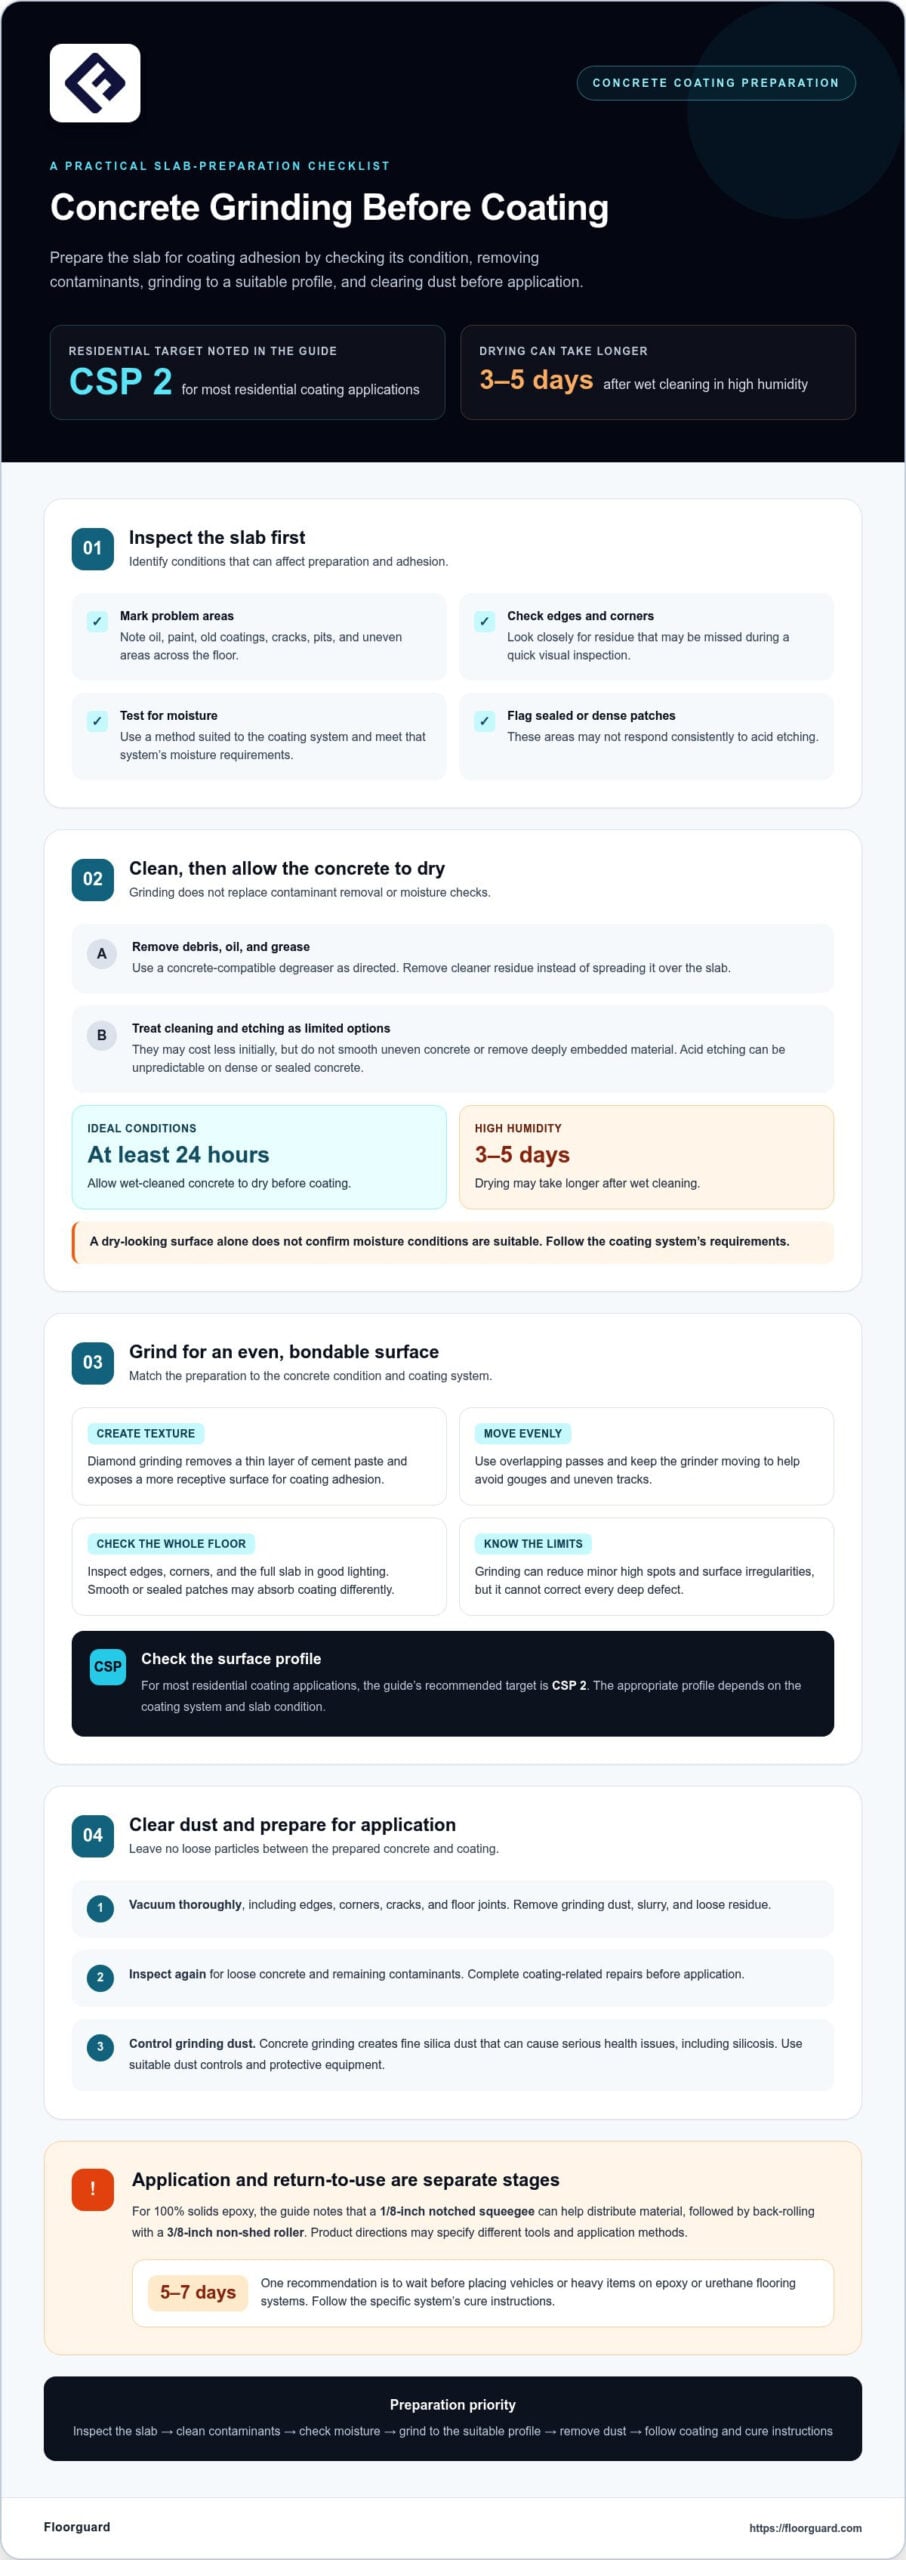
A sound concrete coating starts with preparation suited to the slab and coating system. Concrete grinding before coating creates a textured surface that supports adhesion, but the right approach depends on the concrete’s condition and the product being applied.
For Chicago homeowners, choosing a grinder and diamond grit is only part of the job. The slab’s condition, residue, and intended finish all affect how it should be prepared.
This guide explains how grinding prepares concrete for coating, what to inspect and clean, and how to assess surface profile. You’ll also learn how to choose grinding equipment and diamond grit so you can plan the work more carefully.
Key Takeaways
- Match the concrete’s surface profile to the coating system. For most residential coating applications, the recommended target is CSP 2.
- Inspect the slab for old coatings, oil, stains, and uneven areas before choosing a preparation method.
- Remove grinding dust thoroughly and let the concrete dry before applying epoxy to help prevent adhesion problems.
- Choose grinder size and diamond grit based on the floor area, access, existing coating, and surface condition.
- Use professional preparation when the slab is difficult to assess or requires a consistent profile across the floor.
How grinding prepares concrete for epoxy adhesion
- Grind the slab to create a bondable surface. Concrete can look clean yet remain too smooth for a coating to grip consistently. Diamond grinding removes a thin layer of cement paste and exposes a more receptive surface. It can also remove residue or old coating remnants that could interfere with adhesion. Concrete grinding before coating creates texture for the coating to anchor to, rather than relying on appearance alone.
- Open the surface pores evenly. Move the grinder in overlapping passes, keeping it moving to avoid gouges and uneven tracks. Grinding opens the concrete surface, giving the coating more contact with the prepared slab. A smooth, sealed patch beside a ground area may absorb coating differently. Inspect the entire floor in good lighting, including edges and corners, before application.
- Prepare a uniform base for a cleaner finish. Grinding can smooth minor high spots and remove surface irregularities that may show through the finished coating. For example, a ridge near a garage entrance can affect how the coating spreads and reflects light. Grinding cannot correct every deep defect, but it can make the prepared surface more consistent. Vacuum dust and inspect the slab again so loose particles aren’t trapped beneath the coating.
- Spread epoxy evenly, then back-roll it. For 100% solids epoxy, a 1/8-inch notched squeegee can help distribute the material. Use a coatings squeegee at least 18 inches long, then back-roll with a 3/8-inch non-shed roller to even out the spread. Work in manageable sections and maintain a wet edge. Follow the product’s application directions, since material properties and recommended tools can vary between epoxy systems.
- Protect the coating while it cures. A properly ground surface supports adhesion, but epoxy still needs time to harden before vehicles or heavy items return. One recommendation is to wait 5-7 days before placing vehicles or heavy items on epoxy or urethane flooring systems. Plan concrete grinding before coating with this return-to-use period in mind, and follow the specific system’s cure instructions.
- Control grinding dust during preparation. Concrete grinding creates fine silica dust that can cause serious health issues, including silicosis, according to the Occupational Safety and Health Administration. Use suitable dust controls and protective equipment while grinding. After preparation, remove dust thoroughly before applying epoxy, because particles left on the slab can interfere with direct contact between the resin and concrete.
Inspecting and cleaning concrete before grinding
To grind concrete before coating, inspect the slab, remove contaminants, then grind evenly and clear away dust. Test for moisture using a method suited to the coating system, and meet its moisture requirements before application.
-
Inspect the Slab and Test Moisture
Walk the entire floor and mark oil stains, paint, old coatings, cracks, pits, and uneven areas. Check garage corners and edges, where residue can escape a quick visual inspection. Note sealed or unusually dense patches, as acid etching may not prepare them consistently.
Use a concrete moisture test appropriate for the coating system before preparation. Testing can identify moisture conditions that may interfere with adhesion. Record areas that need closer attention, then plan repairs and preparation around the slab’s condition. Don’t rely on a dry-looking surface alone.
-
Clean and Degrease the Concrete
Remove loose debris, then clean oil, grease, and other contaminants before grinding. Use a concrete-compatible degreaser and follow its directions. Work the cleaner into stained areas, then remove the residue instead of spreading it across the slab. Oil left on a garage floor can persist through grinding and interfere with adhesion.
Cleaning supports a more even preparation, but it doesn’t replace mechanical grinding. Paint, old coating, and deep-set contaminants may remain after washing or scrubbing. After cleaning, let the concrete dry fully before applying a coating. If wet cleaning occurs during high humidity, the slab may need 3 to 5 days to dry.
-
Consider Cleaning or Acid Etching
Use cleaning or acid etching only when the slab’s condition and the coating instructions make that approach suitable. These methods may cost less initially and require basic tools, but they won’t smooth uneven concrete or remove deeply embedded material. Acid etching can also produce unpredictable results on dense or sealed concrete.
Afterward, check for oil stains, paint, or previous coatings that may still block adhesion. Acid solutions can harm people or surfaces if mishandled and require proper disposal. If the slab remains contaminated or uneven, cleaning alone hasn’t prepared it for coating.
-
Check the Surface Before Grinding
After cleaning, inspect the slab again under clear lighting. Confirm that greasy patches, paint films, and loose residue are gone or identified for mechanical removal. Allow wet-cleaned concrete to dry for at least 24 hours under ideal conditions; high humidity can extend drying to 3 to 5 days. A damp surface can compromise coating application.
For water spots on an existing coated floor, clean the spots rather than grinding the coating. Use a soft cloth and a cleaner compatible with the finish, then rinse away residue and dry the area. Grinding prepares concrete for a coating project, it isn’t routine spot cleaning for a finished floor.
Removing dust and allowing the slab to dry
After grinding, remove dust, slurry, and loose residue before applying a coating. Vacuum debris from edges, cracks, and joints, check for loose concrete, and complete coating-related repairs before application.
-
Clear Grinding Dust and Slurry
Vacuum the floor after dry grinding, including along walls, inside corners, and around floor joints. Fine dust can settle back onto the slab after sweeping, so use a suitable vacuum and repeat the cleanup rather than relying on one pass. During dry grinding, one recommendation is to stop every 15-20 minutes to vacuum accumulated dust.
Work methodically across the floor. A reported post-grinding cleanup sequence uses vacuuming, sweeping, and blowing repeatedly for 3-4 hours. Treat edges and cracks as separate cleanup zones: loose dust there can remain hidden until coating application. Check the surface with good lighting, then vacuum any visible residue again.
-
Let the Slab Dry
Allow the concrete to dry completely after wet cleaning or slurry removal. Water remaining in the slab can escape as vapor and contribute to bubbles beneath epoxy. After wet cleaning or using an auto-scrubber, allow at least 24 hours under ideal conditions before coating. Humidity, airflow, and how much water the cleaning process used affect drying.
If the slab was pressure washed, allow it to dry before coating. Don’t judge dryness by the surface alone. Check low spots, joints, and edges, where moisture may linger longer than on open areas. Follow the coating system’s moisture requirements before application, since surface dryness doesn’t reveal all moisture conditions within concrete.
- Remove contaminants and uneven material. Use grinding to remove oil, stains, paint, and old coating residue that cleaning may leave behind. These materials can interfere with adhesion. Inspect transitions and areas where grinding was uneven. Address raised ridges and loose remnants so the coating doesn’t bridge debris or collect unevenly around it.
- Prepare cracks, edges, and joints. Vacuum each crack and joint to remove dust, then check for loose fragments or residue. Complete coating-related crack or pit repairs before application. Keep joint lines clear of grinding debris, and use repair materials compatible with the coating system. Recheck repaired areas after cleanup, since sanding or grinding can create fresh dust.
- Choose cleanup based on the grinding method. Dry grinding leaves airborne and settled dust, so vacuum and check the floor repeatedly. Wet grinding leaves slurry that must be rinsed and removed rather than left to dry into a film. Before coating, confirm that the entire slab is clean, dry, and free of loose particles, including its edges and joints.
Concrete Surface Profile (CSP) requirements
Use the coating system’s preparation instructions to set the target texture before grinding. Then check that the prepared surface is consistent across the slab, not just in one convenient spot.
-
Control the Concrete Surface Profile
Start with a small test area and diamond tooling suited to the coating system. Make steady, overlapping passes, then compare the test area with the system’s profile guidance. Adjust the grinder or tooling before preparing the full floor, rather than discovering a mismatch after the slab is done.
- Keep your passes consistent. Move at a controlled pace and avoid stopping the grinder in one place. Long pauses can create a deeper patch, while rushed passes may leave smoother strips between them. Use the same approach from the center toward walls and doorways. Change your technique only when the concrete or access requires it.
- Check transitions as you work. Compare neighboring sections where grinding passes meet. Look for abrupt changes in texture, especially beside garage walls, at thresholds, and around fixed obstacles. If an area feels noticeably different, make another controlled pass and reassess it. Uniform color doesn’t necessarily mean a uniform surface profile.
-
Check the Concrete Surface Profile
Inspect several locations after grinding, including the slab’s center, edges, corners, and transitions. Compare each area with the coating manufacturer’s profile guidance or an appropriate surface-profile reference. A single check in the center can miss a smooth perimeter or a rough patch near a doorway.
- Separate texture from other readiness checks. A suitable profile doesn’t establish that the slab is clean, dry, or free of contaminants. A textured area, for example, may still have dust or an oil film. Check texture and cleanliness separately, then confirm moisture readiness against the coating system’s requirements before application.
- Keep a simple inspection record. Note the locations you checked and any areas that needed more grinding. A floor sketch or marked plan helps track repairs and rechecks in a large room or commercial space with multiple work zones. Use the same reference throughout the project so the final inspection compares like with like, rather than relying on memory.
- Recheck after adjustments. If you change the tooling or grinding approach, inspect the revised area beside the original test patch. Confirm the transition is gradual and the texture matches the system’s preparation guidance. Check the entire floor again, including edges that required separate tool access. This final inspection can catch inconsistencies before coating begins.
Choosing grinders and diamond-pad grits
Choose a grinder for the floor area and access, then select diamond grit based on the concrete’s condition. Tool size and grit affect removal speed and the profile left behind.
- Match grinder size to the work area. Use a handheld grinder measuring 4.5-7 inches for edges, tight spaces, and smaller sections. A single-disc grinder suits smaller residential projects under 1,000 square feet and usually has an 11-inch-diameter pad. For example, one contributor used a 7-inch grinder on a 425-square-foot garage. Those examples show why access and floor size matter.
- Start with the coating or concrete condition. Coarse diamond-pad grits of 30-40 can remove old coatings and reduce high spots. A 36-grit pad is recommended for tough coatings or severe defects. Use that aggressive approach only where the surface calls for it. The goal is to remove material and prepare the slab, not to grind every floor as deeply as possible.
- Choose finer grit for specific preparation needs. An 80-grit pad is recommended for paint films, while 100 grit is recommended for standard surface preparation. These choices are not interchangeable: old coating, paint, and sound concrete present different tasks. Follow the coating system’s required profile, then choose diamond tooling that can produce it. Avoid selecting grit by number alone without considering what remains on the slab.
- Plan for edges and transitions. A 4-inch angle grinder with a 36-grit disc can reach areas near walls that larger equipment may miss. Keep edge work consistent with the adjoining floor, because a rough band or smooth strip can create a different surface profile. Use a grinder suited to the space, and take care around corners where control is limited.
- Learn the machine before grinding the full floor. First-time users should become familiar with the grinder’s settings and safety instructions. One recommendation is to work at about 1,000 RPM, subject to the grinder manufacturer’s directions. Test the setup in a small area, check how the tooling cuts, and adjust before continuing. Concrete grinding requires specialized equipment and skill to achieve an even, precise surface.
Floorguard: Residential Concrete Floor Coating Installation
Floorguard provides residential concrete floor coating installation for homeowners seeking a professionally prepared surface and a coating system suited to their space. For a Chicago garage floor, the concrete’s condition, moisture, existing residue, and desired finish all help shape the preparation and coating plan. Our team assesses the slab and handles the coating project, including the surface preparation required before application.
For a commercial or industrial concrete floor, traffic and how the space is used also inform coating selection and project planning. Professional installation can be especially helpful when the slab has uneven areas, old coatings, or repairs to address before coating.
Contact Floorguard to discuss your concrete floor coating project, or visit floorguard.com.
Plan the Next Step for Your Concrete Floor
Decide what the finished floor needs to do before choosing a coating approach. A home garage, busy commercial space, and industrial floor can face different demands, so start with how the space is used and what matters most. That gives preparation and coating a clear purpose, rather than treating concrete grinding before coating as a one-size-fits-all task.
Floorguard provides residential, commercial, and industrial concrete floor coating installation. Whether you’re planning a Chicago garage upgrade or a workplace coating project, our team can assess the floor and discuss an appropriate plan.
Take the next step when you’re ready. Contact Floorguard about your concrete floor coating project, and let’s discuss how to move forward with confidence.
Frequently Asked Questions
What is the CSP Scale?
CSP means Concrete Surface Profile. It gives coating professionals a shared way to describe the texture left on prepared concrete. It isn’t a measure of grinder speed or diamond grit. Use the profile reference specified for the coating system and compare it with several representative areas of the slab. This helps communicate surface texture clearly before coating work proceeds.
Why is concrete ground before applying a coating?
Grinding mechanically prepares concrete so the coating can contact a sound surface directly. It can also remove weak surface material that washing alone may leave behind. For example, a floor may look clean but still have a thin residue that affects adhesion. Treat grinding as a preparation step, not a cosmetic polish or a substitute for inspecting the slab.
What concrete surface profile is required before applying epoxy or other coatings?
Follow the profile requirements in the coating system’s technical instructions. Epoxy and other coating systems may call for different preparation, and the slab’s condition matters too. Don’t choose a profile based only on what looks rough enough. Before application, confirm that the entire floor, including transitions and edges, meets the selected system’s preparation criteria.
What tools and diamond-grit abrasives are needed to grind concrete for coating?
Use a concrete grinder fitted with diamond tooling and an appropriate dust-control setup. The tool and abrasive should suit the job, including the area being prepared and any material to remove. Check the grinder and tooling instructions before starting. A small test area can show whether the setup removes material as intended without leaving an unsuitable or inconsistent texture.
Can you apply a concrete coating without grinding, and what alternatives are available?
Cleaning or acid etching can suit some coating projects, but use these methods only when the coating system permits them. A small test area can help show whether the approach leaves a suitable surface. If the slab has old coating, embedded contaminants, or uneven areas, cleaning alone may not address them.
What are the safety risks and dust-control requirements for concrete grinding?
Concrete grinding can release respirable silica dust, a serious health hazard recognized by the Occupational Safety and Health Administration. Use a grinder shroud connected to a suitable dust extractor, and prevent dust from spreading into occupied areas. Wear eye and hearing protection, and follow the equipment manufacturer’s instructions for respiratory protection and operation. Ordinary sweeping is not dust control.
How long after grinding can you apply a concrete coating?
There’s no single waiting period that applies to every slab. Apply the coating once preparation dust and residue are removed, the concrete is dry, and the system’s moisture requirements are met. The interval depends on whether wet cleaning followed grinding, site conditions, and product instructions. A dry-looking surface alone doesn’t establish that the concrete is ready.
How can you tell whether concrete is properly ground and ready for coating?
Use the coating system’s surface-profile guidance to assess prepared areas across the floor, including edges and transitions. Check for loose powder, visible residue, or spots that look markedly different from the surrounding concrete. Rub the surface with a clean, dry cloth to reveal remaining dust. Address missed areas and repeat the inspection before coating begins.


